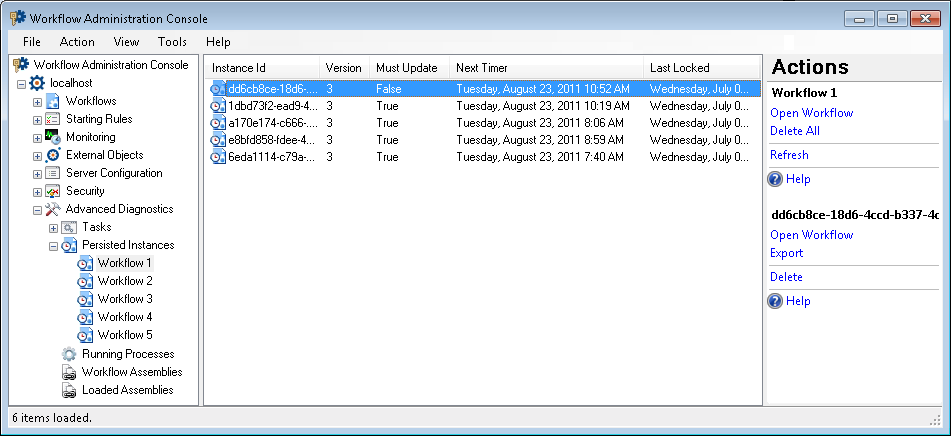
Persisted Instances Node
This node, under Advanced Diagnostics in the Workflow Administration Console, shows workflow instances that are still running but are not actively doing anything (usually they are waiting) and are not using any Workflow Server resources. For each persisted instance, you can see the instance's ID, the workflow's version, whether the instance must update to the latest version the next time it becomes active, its next timer (when the workflow will begin running again based on the timer in a Delay, Deadline, Escalation, or Custom activity), the last time it was locked, and the last time it was modified.
Optionally, you can see if the instance is unlocked or blocked, its runtime, the name of the workflow, and its type. The type column contains the assembly-qualified name of the workflow's class, as loaded from the assembly in the workflow_code table. More information.
To open this node
- In the Workflow Administration Console's Console Pane, expand the Advanced Diagnostics node.
- Select Persisted Instances. The node will list the persisted instances on the Workflow Server.
Tip: You can refresh this list to reflect recent changes by clicking the Refresh link below Persisted Instances in the Actions Pane. Alternatively, right-click the Persisted Instances node and select Refresh.
To open a workflow from this node
- In the Console Pane, expand the Persisted Instances node.
- Select the workflow you want to open.
- Click Open Workflow in the Actions Pane.
- The selected workflow will open in the Workflow Designer.
To export a persisted instance from this node
- In the Console Pane, expand the Persisted Instances node.
- Select the workflow with the persisted instance you want export.
- Select the persisted instance in the center Details Pane.
- Click Export under the instance's ID in the Actions Pane.
- Browse to where you want to save the instance.
- Optional: Rename the file.
- Click Save. The instance will be saved as a .bin file.
To terminate workflow instances from this node
Note: Terminating a workflow instance will permanently stop it, an error will be logged in the Message tab of the workflow instance details, and the workflow's status will be set to terminated.
- In the Console Pane, expand the Persisted Instances node.
- Select the workflow with the persisted instance(s) you want terminated.
- Select one or more persisted instances in the center Details Pane. Hold down the CTRL key to select more than one item a time.
- Click Delete under the selected item's name in the Actions Pane.
- Optional: In the
 Terminate Instance dialog box, you can enter a reason for why you want to terminate the workflow instance.
 - Optional: If you have selected only one workflow instance, you can view the workflow's name, start date, and instance ID by clicking the plus sign
 next to Instance details.
 - Click OK.
- The Terminate Instance dialog box will show a list of the instances and their statuses. Click Close.
- Optional: Click Refresh in the Actions Pane to show the remaining persisted instances.

Note: To terminate all persisted instances for a workflow. Select a workflow in the Console Pane. Click Delete All in the Actions Pane, and follow steps 5-9 above.
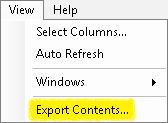
To export the contents of this node in a .csv, .xml, or .txt file
- Select the node in the Console Pane.
- Select View from the main menu.
- Click Export Contents.
- In the Export data dialog box, name the exported file.
- Select CSV File, XML File, or Tab Delimited Text File from the drop-down menu.
- Click Save.